Self-Hosted GitHub Runners: Auto-Replacing Single-Use Dockers
The Goal
GitHub provides cloud-native runners with so many minutes for free each month. In truth, I am nowhere near consuming all of my minutes, and the variety of containers supplied out the box is more than sufficient for any personal project. But why let that stop us when we can do something cool? A quick Google will show many blogs promising “Containerised GitHub Self-Hosted Runners“. While some of the blogs are fantastically written and the solutions elegant; I found in daily use they either didn’t quite work as well as I’d hoped or had design shortcomings. The work below is 100% built on/borrowed from others with additional improvements.
You will need:
– A Ubuntu server with enough resources to run multiple containers
– Docker installed and a reasonable knowledge of containerisation
– A GitHub Account
– A DockeHub Account
The Dockerfile
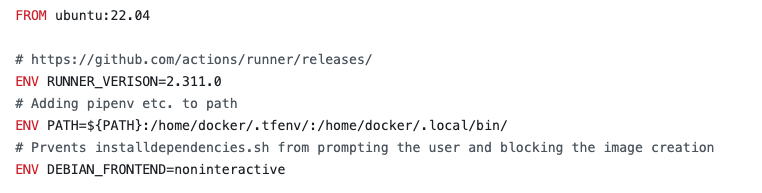
Dockerfile can be found in full here: Dockerfile
At the top of the file, I’ve added a URL as a comment and set the RUNNER_VERSION as a variable. This will need to be manually incremented to the latest version whenever you need to upgrade.
For my projects, I like to make use of different package managers so I’ve added them to the PATH for reference later.
Confession time: I did something bad...
Within the install block, I’ve installed docker within my docker which I would not ordinarily recommend (See here). If this has to be done it should be done as so exposing the docker unix socket to the image allowing the container to make docker calls to the host. I plan to clean this up and update the article but for the time being, I’ve left it in.

In the next install block, we download the GitHub runner making use of the RUNNER_VERSION variable from earlier. After extracting the files we install the GitHub runner and clean up. The second part of the block is about installing Terraform via tfenv. If you have use of Terraform I would also recommend looking at TFSec and TFLint.

The remaining part of the script is setting up the running user, “docker” and configuring the user-specific parts e.g. pipenv requirements and the start.sh.
The Start Script
The start script I had to play around with to support running GitHub as an organisation so be warned, if you are not using an organisation this URL will be different https://github.com/${ORG}.
The second big change I made was around the cleanup behaviour. I wanted to ensure that each stage of the GitHub workflow was independent from the last unless I explicitly opted to carry something forward. This requires the container to terminate at the end of each stage; deregistering itself from GitHub before terminating itself without prejudice.
This is achieved by staging the kill process in the background with a 3-second wait. This gives the container enough time (and a little extra) to send the deregistering request to GitHub.

The second part of achieving the self-terminating behaviour is to update the start command:
--ephemeral: Configure the runner to only take one job and then let the service un-configure the runner after the job finishes (default false)--replace: Replace any existing runner with the same name (default false)
The GitHub Workflow
I’ve put together a very simple GitHub Workflow template here. This is a very simple workflow so please add to it as you need. Also please note this workflow runs on the GitHub cloud-native runner ubuntu-latest since trying to use the runner we developing will create a chicken-and-egg problem.
Further information about the GitHub workflows can be found here https://docs.github.com/en/actions/using-workflows.
Docker Compose
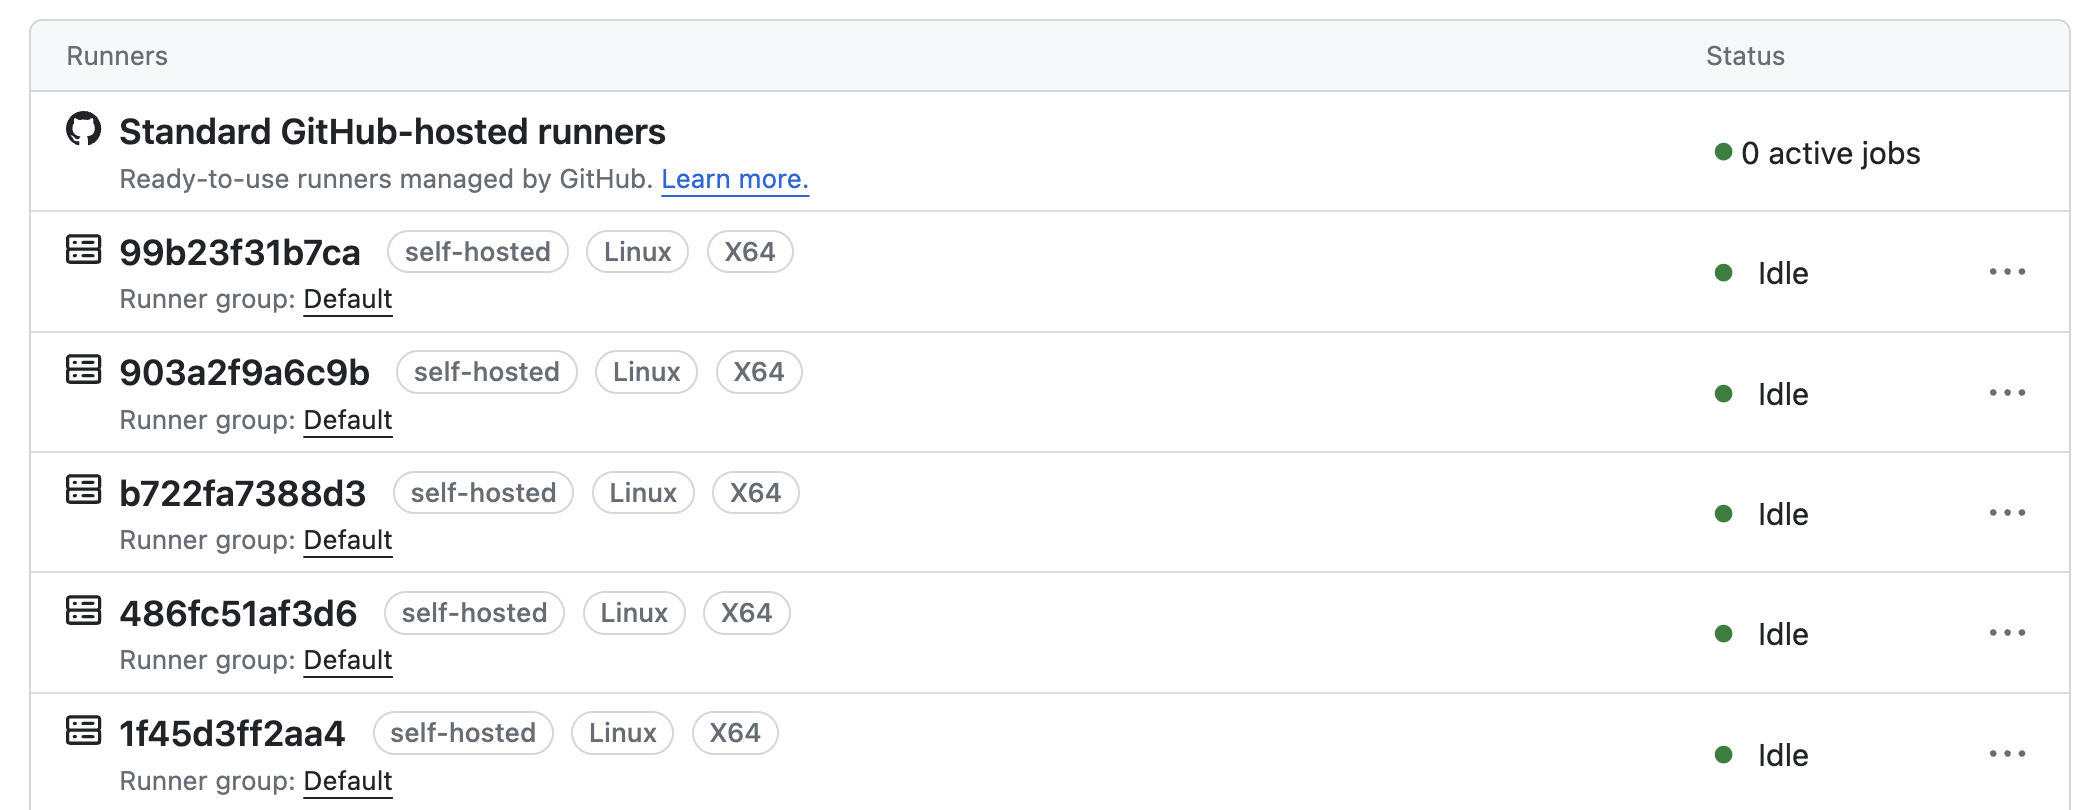
The docker-compose file requires you to add your GitHub authentication token to your .env file i.e. TOKEN=ABC123. The compose.yml itself will spin up 16 replica containers with limited resources. I would recommend calculating how many runners your hardware can support allowing for at least 6GB of RAM. I am running a 16-thread Ryzen with 100GB of memory to give you an idea. Do not remove the docker limitations even if you have plenty of resources – Having unlimited resources is as dangerous as unlimited permissions.
Running our Containers
The Control Script
There will be times when we may want to upgrade our container or work on the host machine etc. Its important that we can both start and stop our containers, deregistering them from GitHub each time. Rather than try to remember to do the correct thing I created this script which has 3 possible executions:
- Stopping the containers
- Starting the containers
- Removing the old image and starting the container
The Crontab
My hard work gets shut down overnight because I’m sleeping and therefore not using it. Whether you are paying for the electricity or paying AWS it’s important that we switch things off when they aren’t needed. This also has additional security benefits too.
The second use case for the cron is to start the containers. Until now we have focused on making sure our containers terminate after each use but this will quickly leave us with zero running containers unless we start new ones. The cron runs every minute which will launch new containers ensuring we have our specified number of replicas ie. 16 replicas.
The third use is to ensure that each morning we pull an updated image and build our containers. Ideally, I would like this step to be done via Continuously Deployment but, it’ll have to wait for another day. The example Cron can be found here.
Logrotate
General rule: You make it, you’re responsible for it. In the crontab, we are generating a log file so we can see what is going on. Therefore we need to make use of logroate to ensure our log files don’t continuously grow until they fill our disk space and become unreadable. In case you’re not familiar with logrotate I’ve created a starting example here.
Summary
Creating self-hosted GitHub runners is not the easiest thing I’ve done but I’m happy with the result. The biggest sticking point was getting the containers to deregister and terminate correctly. I kept finding that I had “offline” runners on the GitHub page which needed manually removing. I think the next iteration of this will be to see if I can build it using Kubernetes and have the cluster autoscaling rather than persistently at a fixed number of containers.
If you have further questions or there is something I need to explain please drop me a comment
References
- https://yonatankra.com/how-to-use-github-actions-self-hosted-runners/
- https://baccini-al.medium.com/how-to-containerize-a-github-actions-self-hosted-runner-5994cc08b9fb
- https://github.com/myoung34/docker-github-actions-runner
- https://dev.to/pwd9000/create-a-docker-based-self-hosted-github-runner-linux-container-48dh
- https://testdriven.io/blog/github-actions-docker/